By clicking “Accept All Cookies”, you agree to the storing of cookies on your device to enhance site navigation, analyze site usage, and assist in our marketing efforts. View our Privacy Policy for more information.
Client Homework
Explore Yip Fitness client homework with guided stretches, foam rolling, strength exercises, and workout videos to support mobility, recovery, posture, and overall movement.
By
September 26, 2026
Related

Client Homework
Foot Pain
Rest, and try not to walk as much. Do the foam rolling and stretching techniques below 1–5 times a day.
Foam Rolling
Calves Foam Rolling: The technique is to press your calf onto the foam roller or ball and move your foot up, down, and sideways to see if you can find a knot that is sensitive and release the tension of the knot to help recover full range of motion. If you do not feel any pain, move on to another part of your calf. If you find a big knot, stay on that area for at least 1–2 minutes, depending on when the knot releases and melts away.
Stretching
Calf Stretch: Use a doorway to give yourself more grip. It is also easier to get a deeper stretch with shoes on. Make your foot as vertical as possible, stand up straight, and pull your hips closer to the wall to get a deeper calf stretch. Hold for 1–2 minutes to get a good calf stretch and prevent future foot issues like plantar fasciitis. Doing this before and after a walk, jog, or workout will increase your chance of preventing injuries.
Bad Posture
Do these exercises at least once daily and up to 3–5 times daily. Perform each exercise for 1–2 minutes. Stop the exercise if you don’t feel the stretch or foam rolling sensation.
Foam Rolling
Pecs Foam Rolling: Press your pec onto the ball and move your arm up, down, and sideways to see if you can find a knot that is sensitive and release the tension of the knot to help regain range of motion. If you do not feel any pain, move on to another part of your pec. If you find a big knot, stay on that area for 1–2 minutes depending on when the knot releases.
Stretching
Chin Tuck: Try to be aware of your posture and where your chin is at all times. Try to keep your shoulders relaxed while you practice tucking your chin in and out.
Foam Rolling
Foam Roll Neck and Shoulders: Press your shoulders onto the ball and move your arm up, down, and sideways to see if you can find a knot that is sensitive. Releasing the tension of the knot will help regain full range of motion. If you do not feel any pain, move on to another part of your shoulders. If you find a big knot, stay on that area for 1–2 minutes depending on when the knot releases.
Stretching
Wall Angels: Back flat against the wall, maintain a half-squat position. Chin tucked, bring arms up overhead while having shoulders, elbows, and wrists in contact with the wall. Once reaching the end range of motion at the top, begin to slide down and pinch shoulder blades while maintaining all points of contact with the wall. 10 reps, 3 sets.
Doorway Stretch: Arms at a 90-degree angle. Place one foot forward and press your body forward with your hips to help you feel the stretch. Hold for 30 seconds to 1–2 minutes.
Back Pain
If you are sitting a lot, your low back and glutes start to get tight. It is good to foam roll and stretch to open up the tightness 1–5 times a day, depending on pain.
Foam Rolling
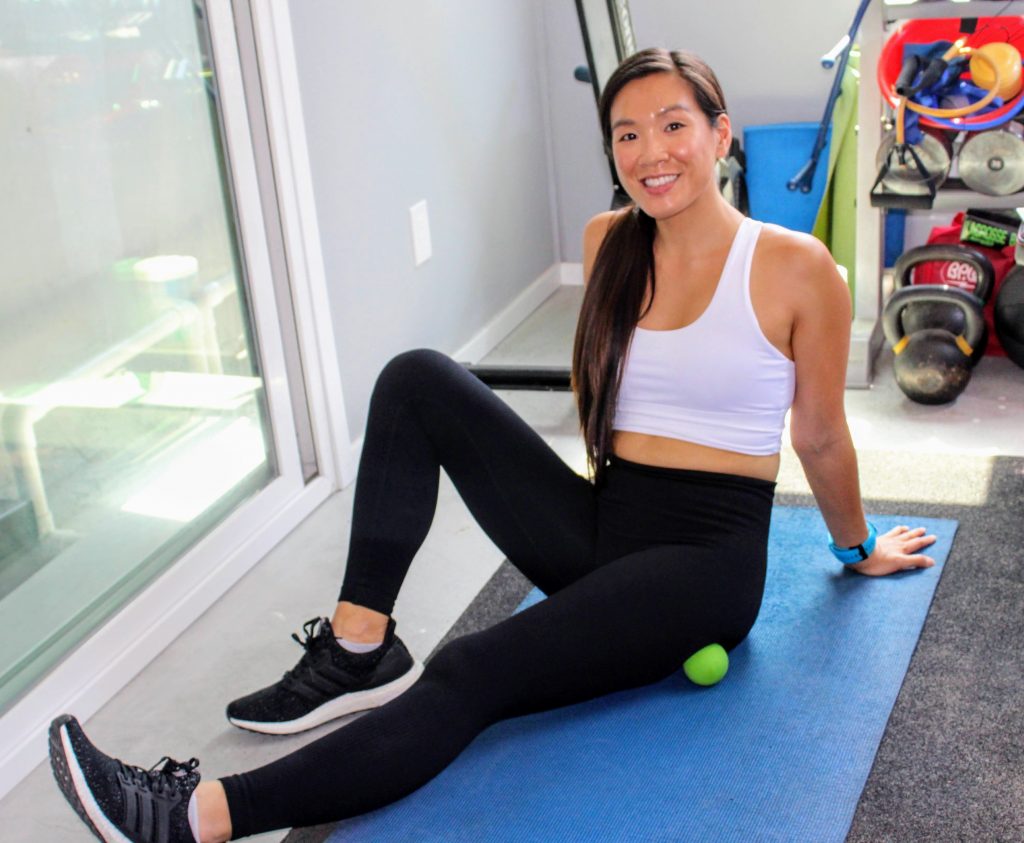
Roll Glute with Lacrosse Ball: Press your glute onto the ball and have the leg that is sitting on the ball straight and the other leg bent. If you can find a knot that is sensitive when sitting on the ball, the goal is to release the tension of the knot. If you do not feel any pain, move to another part of your glute. If you find a knot, stay on that area for 1–2 minutes depending on when the knot releases.
Roll Back with Lacrosse Ball: Press your back onto the ball to see if you can find a knot that is sensitive and release the tension of the knot. If you do not feel any pain, move on to another part of your back. If you find a big knot, stay on that area for 1–2 minutes depending on when the knot releases.
Stretching
Iron Cross: Lay on your back, arms at a T, bring one leg up, and cross the body without lifting the shoulders off the ground. Alternate legs for 10–30 reps.
Back Stretch, Hold: Lay on your back, arms at a T, bend the knee and cross the body. Use the opposite hand to hold the knee down and put more pressure. Make sure to keep both shoulders down. Hold for 10 breaths or 30 seconds to 2 minutes. Do both legs.
Top of the Knee Pain
Top of the knee pain usually is caused by tight quads.
Foam Rolling
Roll Quad: Press your quad onto the ball and move your leg up and down. Pay attention to whether you can find a knot that is sensitive. Release the tension of the knot to help regain full range of motion. If you do not feel any pain, move on to another part of your quad. If you find a big knot, stay on that area for 1–2 minutes depending on when the knot releases.
Stretching
Quad Stretch: Shoulders back, point the knee to the ground, and pull from the toe. Make sure to keep your feet flat to help with ankle balance. Hold for 1–2 minutes.
Behind the Knee Pain
You need to do the following glute exercises to prevent behind-the-knee pain because your hamstrings and glutes are likely weak. Do these daily for at least 1–2 months.
Strength Exercises
Lateral Band Walks: Put the band at your ankles. Make sure to keep tension and don’t allow the band to fall from your ankles. Squat lightly where your knees don’t pass your toes and push your glutes back while still keeping your chest up.
You can measure by distance, by time (1–3 minutes), or by when you feel the burning in your glute. You can use a thicker resistance band to make the movement more difficult and feel the burning faster.
Two Feet Bridges: Lay on your back with two feet shoulder-width apart. Push through your heels and lift your glutes as high as you can so your hips and stomach are in a straight line. Make sure your knees are about 90 degrees, not too close or too far from your glutes. You can either hold the movement or do reps up and down.
Single Leg Bridge: Lay on your back with your feet together, one leg up and straight, and quads even. Follow similar directions for breathing, foot placement, and pushing through your heels.
Options on Duration: 10 reps, 3 sets; 30-second hold, 3 sets; or 1-minute hold, 3 sets.
Tight Neck
It is important to sleep on a flat pillow, pay attention to forward head posture, and maintain good posture. Do chin tucks and doorway stretches to prevent your neck from getting too tight. Do these daily 1–5 times.
Stretching
Upper Trap Stretch – Holding Chair and Head: While sitting in a chair, hold the seat with one hand and place your other hand on your head to assist in bending your head to the side as shown. Hold for 1 minute, 3 sets.
Neck Levator Scapula Stretch: Sit in a chair and hold onto the underside of the seat with one hand. Rotate your head to the opposite side of the hand that is under your chair. Take the opposite hand and pull your head and nose toward your armpit. Hold for 1 minute, 1 set.
Deep Anterior Neck Flexor Stretch, Hands on Chest: Place your hands overlapping on your breastbone. Next, tilt your head upward and away from the affected side until a gentle stretch is felt along the front and side of your neck. Hold for 1 minute, 1 set.
Full Body Weight Training
Level 1
Marching with Dumbbells: Extend arms next to ears with dumbbells.
Duration: 1–5 minutes.
Level 2
Seated Squat with Dumbbell Overhead: Extend arms next to ears with dumbbells, with knees at a 90-degree angle when seated.
Duration: 1–5 minutes.
Level 3
Bear Crawl: The higher the glutes are, the easier it is. The lower the glutes are, the more core strength is required. Don’t elevate your shoulders and keep your hands flat.
Duration: 1–5 minutes.
Level 4
Mini Workout
Static Squat Hold: Don’t let your knees pass your toes.
Duration: 30 seconds–5 minutes.
Push-Ups (Incline, Momentum, Knee, Strict): Squeeze your abs to protect your back.
Duration: 30 seconds–5 minutes.
Plank (Knee, Low, High Plank): Squeeze your glutes to protect your back.
Duration: 30 seconds–5 minutes.
Class Workouts
- The first video in a workout playlist is the stretching routine.
- The second video is the warm-up. Perform this movement as a Tabata: 20 seconds on, 10 seconds off, for a total of 4 minutes.
- The remaining videos are the core movements. Do 2 sets of each movement, 1 minute each set.
Workout 1: Basic
Workout 2: Holds
Workout 3: Sideways
Workout 4: Forwards and Backwards
Workout 5: Jumping
Workout 6: Punching
Workout 7: Kicking
Workout 8: Lateral Movements
Workout 9: Full Body
Photographed and Filmed by Cassie Barron